User roles
Chaser offers four main user roles (with one additional user role if you use Xero and the Cash Flow forecast), offering more flexibility and security. If a user attempts to access a section they don’t have permissions for, they’ll see a message explaining that additional permissions are required.
|
Role |
Access Level |
Capabilities and Restrictions |
|
Owner |
Full access to Chaser, no restrictions. |
They can re-assign the Owner role to another user (which automatically makes the recipient an Owner). They can add other Owners. |
|
Manager |
High level of access. |
They can manage users below their own role and create new Managers, Contributors, or Viewers. They can access and modify settings in Manage (General, Templates, Schedules, Timings, Payment Portal, Early payment discounts, Late payment fees). |
|
Cash Flow Manager |
High level of access. |
This option is only visible if you use Xero and the Cash Flow forecast, this provides the same level of access as the standard Manager role. |
|
Contributor |
Moderate access. |
Can interact with customer data, add notes and register calls. Can edit customer details and schedules. Can use credit check credits. Can send a chase using Chase now. |
|
Viewer (view only) |
Limited/Read-only access. |
Cannot change any settings in Chaser and can only view information. |
Billing Permissions: Owners automatically have billing permissions enabled. Billing permissions can be enabled for any other user, allowing them to upgrade/downgrade plans and purchase add-ons. To add a new user:
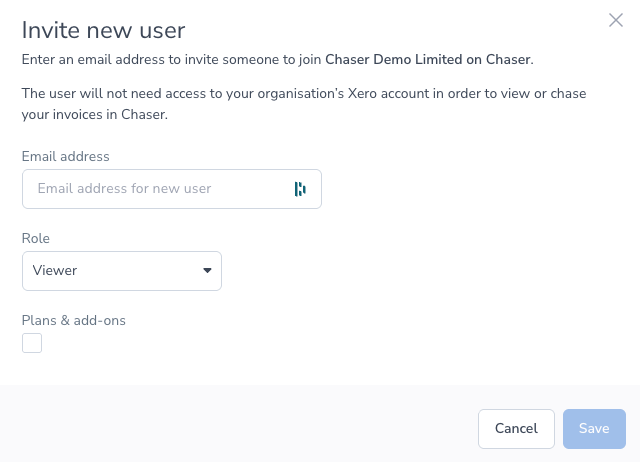
- Click the person icon in the top right corner of Chaser.
- Select Organization settings and view the Users tab.
- Click Invite new user.
- Enter the email address of the person you wish to add.
- Select the user’s role. The user who is inviting the new user will be prompted to select their role. The inviter can only assign roles equal to or less than their own permissions.
-
- Note that a role selection is mandatory when inviting a new user.
- Click Save.
-
- The invitee will receive an email with a confirmation link.
- They must click this link and follow the instructions to access your organization.
- Newly invited users will be listed as not verified until they click the confirmation link.
- Add email senders separately by navigating to Manage > Sending via the left-hand side menu in Chaser and follow the same verification process.
Special considerations:
- Users who are Owners have full access to user management, including adding and deleting users. Managers can manage users below their role, but cannot delete or edit the roles of Owner users. Contributors and Viewer users cannot add new users or delete users.
Delete users
- To delete a user, navigate to Organization settings and click on Users.
- During the trial period, the organization's owner can delete users. This responsibility transfers to the subscriber upon upgrading to a paid plan. It's not possible to delete the Owner or Subscriber
- Only Owners can delete other users with the Owner role. However, there must be at least one user with the Owner role.
- Click Delete next to the user you wish to remove.
- Confirm by selecting Yes, delete. This action removes the user from your organization.
- The individual will still be an active sender, even after removing them as a user if listed under Manage > Senders. If you'd like to remove them from here as well ensure you do so by clicking the three dots on the right hand side of their name and clicking Delete.

- Users can only gain access to your accounting system if they have access to it directly.
Related articles