Last updated: January 01, 1970

Get started: Sign up for a free trial with Chaser
Before connecting to your AccountsIQ account, take out a free trial by filling out the following short form: https://www.chaserhq.com/signup
Connect Chaser to AccountsIQ
To connect Chaser to AccountsIQ you will need the Company ID and User Key from AccountsIQ.
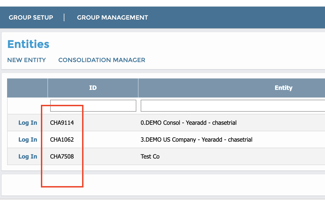
To find these details, log into AccountsIQ and follow these steps:
- Navigate to Setup.
- Then navigate to Company Details & Settings.
- From there, you should be able to see the Company ID of the company that you would like to connect to Chaser. Copy the one you would like to connect.
Once you have the Company ID, you can now retrieve the User Key. To obtain the User Key, follow these steps in AccountsIQ:
- Navigate to Setup.
- Then navigate to Company Details & Settings.
- Click Integration.
- Then click Request User Key (you will need to input your password for this).
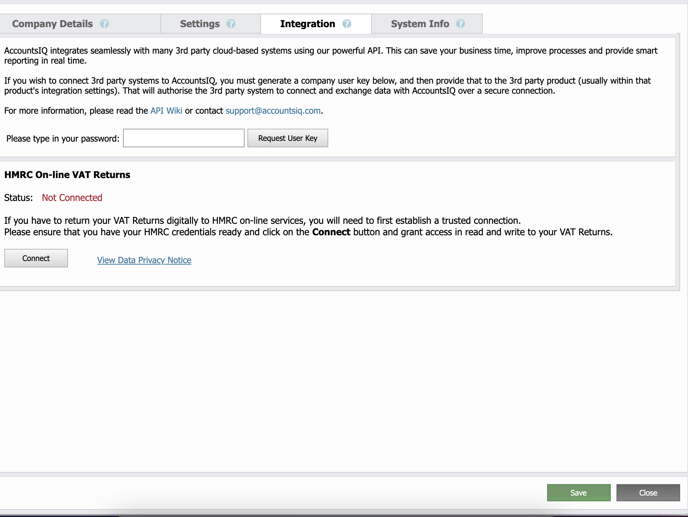
Please note: Your AccountsIQ User Key is different from your AccountsIQ password. It is a long string of digits, numbers and special characters and will look something like this (Please ensure you click 'Save' after generating the key in AccountsIQ):

You'll need to paste this User Key here in Chaser:

It is also important to note that the User Email which is shown above, matches the email address you have used to login to Chaser - we advise connecting Chaser to a generic email address account in AccountsIQ. This is because User Keys are specific to a user in AccountsIQ. If the user leaves the organisation and is deleted from AccountsIQ, then their User Key will no longer work in Chaser - this is not a mandatory requirement.
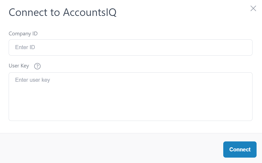
- After verifying your email and logging into your Chaser account you will be asked to connect your accounting system. Click AccountsIQ and then click Connect with AccountsIQ.
- Enter your Company ID and User Key values that you have just retrieved into Chaser, and select the correct location of your AccountsIQ company.
- Click Connect and Chaser will launch
- Chaser is now connected to AccountsIQ and you can now choose your Chaser account settings
*Tip: Your AccountsIQ region can usually be found in the URL of your AccountsIQ account:
![]()
After connecting AccountsIQ to Chaser, you can choose your Chaser account settings to tailor your accounts receivable process to best suit your business needs. This includes the business name, country, timezone and currency.
How does the Chaser's integration with AccountsIQ work?
Chaser has a direct integration with AccountsIQ’s API. When Chaser connects with your AccountsIQ account, Chaser is provided with a unique API token that allows access to the Organization and Accounting data in your AccountsIQ account. Once Chaser has the API token from AccountsIQ, Chaser can request information to be pulled from your AccountsIQ account into Chaser. AccountsIQ’s API uses OAuth 2.0 to authenticate API tokens.
To have the most up-to-date data, we regularly pull accounting data from your AccountsIQ account. These syncs fetch data that has been created or updated since the last sync.
Sync Chaser with AccountsIQ
Chaser syncs with AccountsIQ before payment reminder emails or forewarns are sent out. This ensures that all information is up to date before Chaser emails are sent out.
You can also sync Chaser with AccountsIQ at any time in the Chaser app by clicking the Sync now button in the top right of your screen, should you require data to be synced immediately.
What information does Chaser pull from AccountsIQ?
Contacts
Through the AccountsIQ API, Chaser retrieves your contacts from your AccountsIQ account. Chaser pulls through the email addresses, phone numbers, physical addresses and invoices associated with a customer contacts in AccountsIQ. If you'd like to bring in multiple contacts for one customer within AccountsIQ, in order for this to be reflected correctly within Chaser you need to do the following:
- Select Contacts within the relevant customer in AccountsIQ
- Add the additional contacts using the New contact button
- Click Save
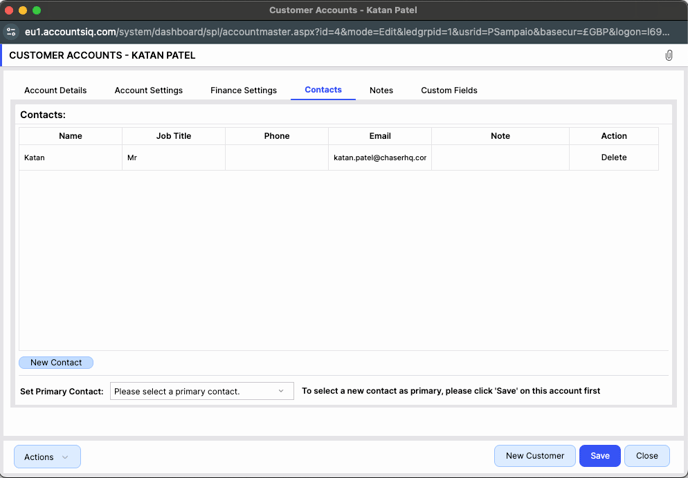
Chaser pulls through all the email addresses under Contacts in AccountsIQ. This means that you can have multiple recipients in Chaser. You can have a Normal sender and an Escalated sender. You can also get directed straight to the customer in AccountsIQ by clicking the 3 dots on the right of the customer and clicking 'Edit in AccountsIQ'.
Invoices
Chaser pulls your customer's invoice data directly from your AccountsIQ account.
Chaser uses the due date and the creation date from AccountsIQ to calculate how many days overdue an invoice is.
You can also go directly to the invoice in AccountsIQ from Chaser by going into the invoice page by clicking through an invoice in the Receivables tab and clicking the icon in the top right to View in AccountsIQ.
Customise invoice attachments
This feature allows you to attach a custom PDF file to your email reminders instead of the standard invoice generated by AccountsIQ.
How to Enable the Setting
- Navigate to the Integrations page in your account.
- Locate the setting: Replace the default AccountsIQ invoice PDF with a custom attachment.
- Toggle the setting ON to enable the functionality.
- Enable the setting to Attach Copy Invoice on each of your email templates to attach the PDFs to your email reminders.
To use this feature, you must upload a single PDF attachment to the invoice in AccountsIQ. Multiple PDF attachments are not supported currently, as Chaser can only attach 1 PDF per invoice. If multiple PDF attachments are associated with the invoice, the standard AccountsIQ PDF will be used.
The AccountsIQ-generated invoice will be attached to your email reminders when
- The setting Replace the default AccountsIQ invoice PDF with a custom attachment is enabled, and the Attach copy invoice setting is enabled on your template, but no PDF has been uploaded.
- The setting Replace the default AccountsIQ invoice PDF with a custom attachment is enabled, and the Attach copy invoice setting is enabled on your template, and multiple PDFs are attached to your invoice in AccountsIQ.
- If the setting Replace the default AccountsIQ invoice PDF with a custom attachment is disabled, and the Attach copy invoice setting is enabled on your template.
Troubleshooting
Why isn't my company connecting?
The most common reasons for your AccountsIQ company not connecting are the following:
- You may have selected the incorrect location of your AccountsIQ company, please check your AccountsIQ company location in AccountsIQ.
- Please make sure there are no spaces/commas next to your CompanyID and your User Key.
Why is an invoice that is paid in AccountsIQ still showing showing as unpaid in Chaser?
AccountsIQ has a limit on the amount of data that can be retrieved via its API. As a result, your initial sync will only include up to 9 months of historical data. If you notice invoices in Chaser that have already been paid, please contact support@chaserhq.com, and our team will carry out a manual sync that can retrieve up to 48 months of data.